Spring Gardening Tin Cans for Small Planters
Give Tin Cans A Small, Useful Garden Job
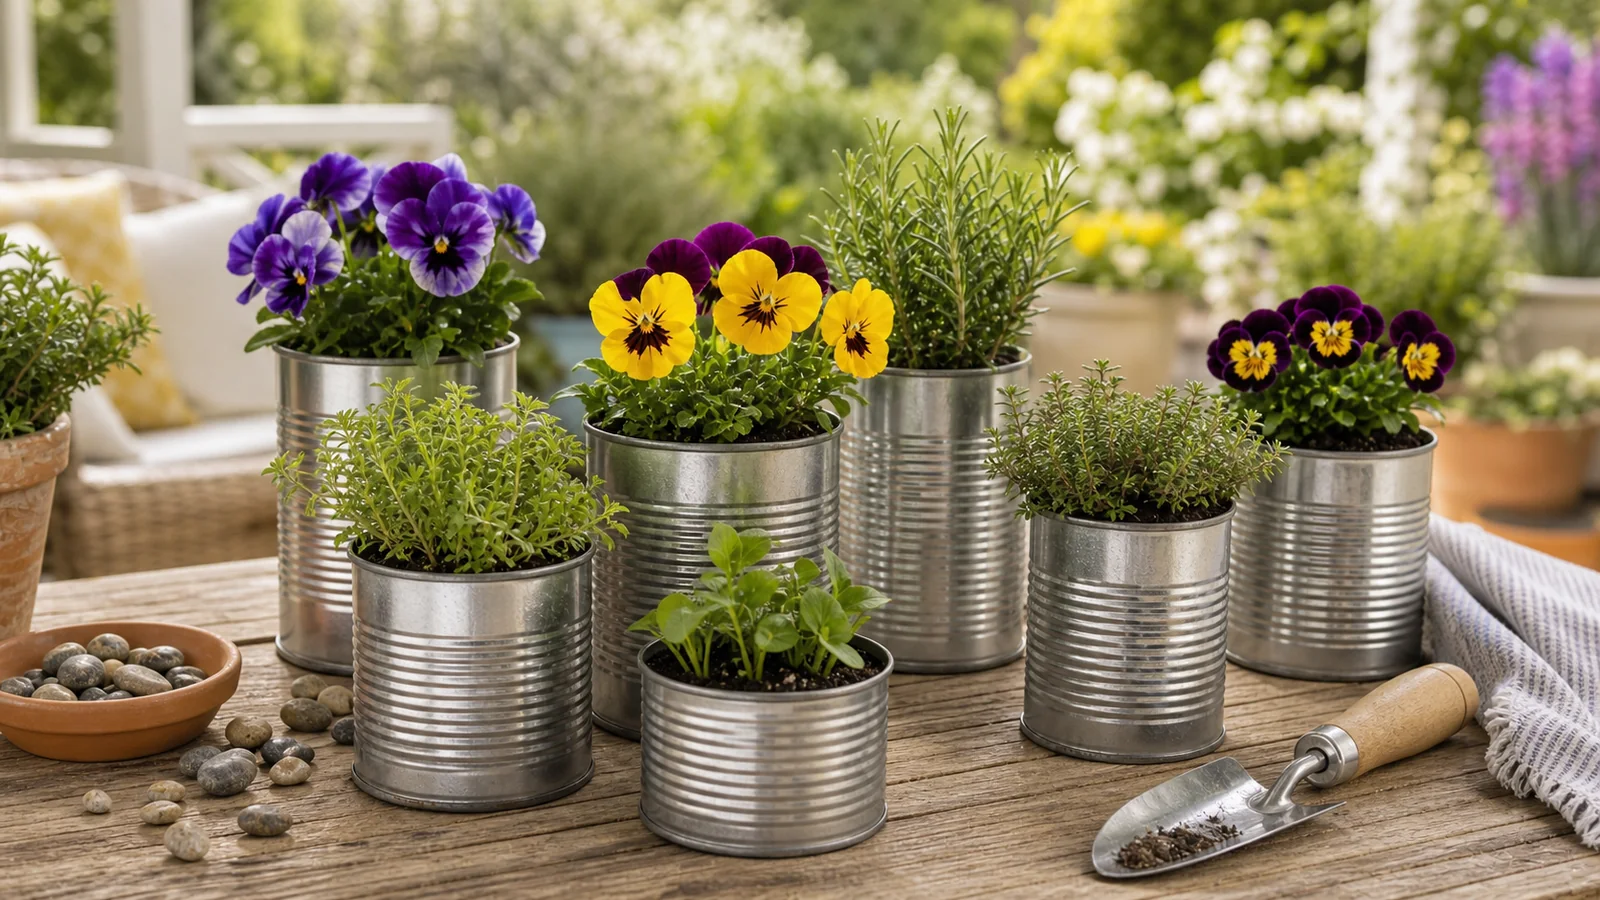
Spring gardening tin cans are charming because they turn something ordinary into a quick patio or windowsill project. A row of small cans can hold herbs, pansies, violas, lettuce starts, marigolds, or plant labels for a seed-starting shelf. They are inexpensive, easy to decorate, and just right for a weekend refresh.
They are also small metal containers with sharp edges, limited root space, and drainage needs. Treat them as temporary small planters or decorative cachepots, not as permanent homes for large plants.
Used carefully, tin cans can make spring gardening feel playful without creating a soggy, rusty, or unsafe mess.
Choose The Right Cans
Start with clean food cans that are not dented, heavily rusted, oily, or lined with unknown residue. Remove labels, wash the cans well, and let them dry. If glue remains, soak the can in warm water and scrub gently.
Avoid cans that held paint, solvents, automotive products, or household chemicals. Those are not worth the risk for plants, patios, or hands. For edible herbs, be even more selective. Use clean food cans only, or use the can as a decorative outer holder with a nursery pot inside.
The best cans for spring planters are sturdy enough to hold their shape and deep enough for the plant you want:
| Can size | Better use | Avoid |
|---|---|---|
| Small tomato paste can | Plant labels, tiny succulent-style display, craft use | Herbs with real root needs |
| Standard soup can | Pansies, violas, small herbs, seedling gifts | Large vegetables or thirsty flowers |
| Large coffee can | Mixed spring annuals, small lettuce group, nursery-pot cachepot | Permanent shrubs or deep-root crops |
| Tall narrow can | Single decorative grass or cut-flower support | Plants that need broad root space |
If the can feels flimsy before planting, it will not improve once filled with wet mix.
Smooth Every Sharp Edge
Sharp rims are the biggest practical problem with tin can planters. A can opener can leave edges that catch skin, gloves, leaves, or plastic liners. Before planting, run a gloved finger carefully around the rim without pressing hard. If anything snags, smooth it.
Use a file, sandpaper, or a safe-edge can opener if you have one. You can also cover the rim with folded decorative tape, fabric, twine, or a fitted plastic edge, but do not rely on decoration alone if the metal underneath is still sharp.
Work slowly. Wear gloves. Keep children away from the cutting and drilling steps. If a can has a jagged rim you cannot fix, recycle it and choose another.
For a project with children, let adults prepare the cans first. Kids can help fill, decorate, label, and water once the containers are safe.
Add Drainage Holes Before Planting
Most plants do not want roots sitting in stagnant water. Tin cans need drainage unless you are using them only as outer cachepots. A few pebbles in the bottom are not a substitute for real holes.
Use a drill, nail and hammer, or metal punch to make several holes in the bottom. Work on a scrap board so the tool has somewhere to go. Wear eye protection and gloves. Turn the can over and check for sharp burrs after making the holes.
If the can will sit flat on a table or patio, raise it slightly on small feet, stones, or a saucer with space underneath so water can leave the holes. Empty saucers after rain if water collects.
No-drainage cans can still be useful as cachepots. Keep the plant in a plastic nursery pot with drainage, set that pot inside the can, and remove it for watering. This is often the easiest option for indoor herbs or gift plants.
Use Potting Mix, Not Heavy Garden Soil
Tin cans are small containers, so the growing mix matters. Heavy garden soil can compact, drain poorly, and leave little air for roots. A light potting mix is usually a better choice.
Pre-moisten the mix before filling. Dry potting mix can repel water at first, and water may run down the sides instead of soaking evenly. Fill the can, tap gently to settle, and leave a little space at the top so water does not spill over immediately.
For most spring annuals and herbs, use a quality all-purpose potting mix. For succulents, use a sharper, faster-draining mix and be extra careful with watering. For seedlings, use a seed-starting mix if the plants are very young.
Because cans are small, they dry out quickly in sun and can also heat up. Check moisture often, especially on warm, windy days.
Pick Plants That Fit The Scale
A tin can is not a tomato pot. It does not offer enough root room, water storage, or stability for large plants. Choose small, short-term, or decorative plants that fit the container.
Good spring choices include:
- Pansies and violas
- Small calendula or marigold starts
- Parsley, chives, thyme, or small basil starts
- Lettuce or microgreens for short-term harvest
- Wheatgrass or cat grass in a safe household setting
- Small sedum or succulent-style arrangements where climate and care fit
- Seedlings that will be transplanted soon
Avoid deep-rooted vegetables, large herbs, permanent perennials, thirsty mixed plantings, and anything that needs room to spread. If you want a productive herb garden, tin cans can start the idea, but larger containers will be easier to maintain.
For broader container planning, our North Haven Gardens ideas article explains why plant size, heat, and watering should come before the pretty display.
Make A Simple Spring Tin Can Planter
This is the easiest version for a patio table, sunny windowsill, or porch shelf.
- Wash and dry a clean food can.
- Remove or cover sharp edges.
- Make drainage holes in the bottom.
- Add a thin layer of potting mix.
- Set the plant at the same depth it was growing before.
- Fill around the roots with more mix.
- Water gently until water drains out.
- Let the can drain fully before placing it on furniture.
- Add a label or simple decoration if you want.
Do not pack the mix tightly. Roots need air as well as water. If the plant sinks after watering, add a little more mix around the edge.
If you are using the can indoors, place it on a saucer and protect the surface underneath. Metal can leave rings or rust marks as it ages.
Try A Spring Herb Lineup
Tin cans are especially good for a small herb lineup near a kitchen door. Use one herb per can so each plant has its own root space and watering needs.
Choose herbs you will actually use. Parsley, chives, thyme, oregano, and small basil starts are all reasonable short-term options, depending on your light and temperature. Rosemary usually wants more root space and sharper drainage, so it may be better in a larger pot.
Group the cans on a tray, shallow crate, or shelf. This makes watering easier and protects the patio. Keep the cans where you will notice them. Small containers fail quickly when they are tucked out of sight.
Harvest lightly at first. Let the plants settle before cutting heavily. If a herb outgrows the can, move it to a larger container instead of trying to keep it cramped.
Make Tin Cans Work For Seed Starting
Tin cans can hold seedlings for a short time, but they are not always the most convenient seed-starting container. They are opaque, rigid, and harder to squeeze during transplanting than plastic cell packs. They also need drainage and careful handling.
Use them for larger seedlings you will transplant soon, or for decorative seedling gifts. For serious seed starting, trays or reusable pots may be easier.
If you do start seeds in cans:
- Use a seed-starting mix.
- Label clearly.
- Keep the mix evenly moist but not soggy.
- Provide enough light.
- Transplant before roots circle heavily.
- Tip the plant out gently rather than pulling the stem.
For a spring project with visual payoff, you may prefer planting young starts instead of starting seeds in the can.
Decorate Without Hurting The Plant
Decoration is part of the fun, but keep plant health and safety first. Paint only the outside unless you know the coating is safe for the use. Let paint cure fully before planting. Avoid glitter, flaking finishes, or materials that can wash into soil.
Simple decoration ideas:
- Wrap the outside with jute twine.
- Paint a matte color that suits the patio.
- Use a paper label on a stick instead of writing on the can.
- Group cans in a shallow wooden tray.
- Tie on a small tag for a gift plant.
- Leave the metal plain for a relaxed utilitarian look.
If you want the can to last longer outdoors, expect some rust over time. You can embrace that temporary aging, use the can under cover, or keep it as a cachepot so the inner nursery pot does the growing work.
Water Small Metal Planters Carefully
Small metal planters can swing between too wet and too dry. They hold little soil, heat quickly in sun, and drain fast if holes are generous. Check them with your finger rather than watering on a fixed schedule.
Water until moisture reaches the lower mix and begins to drain. Then let the top layer dry slightly before watering again, depending on the plant. Do not leave cans sitting in water-filled saucers.
Move cans out of harsh afternoon sun if plants wilt repeatedly. The can may be heating the root zone more than the plant likes. Morning sun and bright afternoon shade often work better for many spring flowers and herbs.
If leaves yellow, stems collapse, or the mix smells sour, check drainage first. Waterlogged roots are a common container problem.
Know When To Move Up
Tin cans are best as spring starters, table accents, gift planters, and short-term displays. When roots fill the can, growth slows, or watering becomes constant, move the plant to a larger container.
Signs it is time:
- Water runs through immediately and the plant wilts soon after.
- Roots circle the bottom.
- The plant tips the can over.
- Leaves stay small or pale despite good light.
- The can is rusting through.
- You need to water more often than is practical.
Moving up is part of the project, not a failure. A tin can can begin the season, then pass the plant to a larger patio pot once the weather settles.
If the project inspires a larger patio refresh, our soil amendments for gardens guide explains when to use potting mix for containers and when to improve in-ground beds differently.
Keep The Project Small And Cheerful
Spring gardening tin cans work best when they stay simple. Choose clean cans, smooth the edges, add real drainage, use potting mix, and pick plants that fit the scale. Treat the cans as temporary planters or decorative holders rather than forever containers.
That modest approach is what makes the project useful. A few cans of herbs, violas, or seedlings can brighten a porch, teach container basics, and reuse materials without asking for a big budget or a full garden redesign.
You might also like
Market Gardening Lessons for Home Beds
Use market gardening principles to plan productive home beds with clear paths, soil care, succession planting, and easier harvests.
Chaos Gardening Without A Mess
Try chaos gardening with smarter seed choices, light prep, clear edges, and simple thinning so the bed feels lively, not messy.
Soil Amendments for Gardens That Work
Choose soil amendments for gardens by testing first, matching compost, mulch, lime, sulfur, and organic matter to the actual soil problem.